Friday, July 27, 2012

Akai Roberts Tube Monoblock to Plexi 8 Guitar Amp Conversion

Here are some more time-lapse videos of one of my builds. This one is of me building one of my original designs, an 8 watt, single ended, Plexi style guitar amp out of an Akai Roberts tube monoblock amp from one of their 60's reel to reel decks. I did the teardown, desoldering, and cleanup of the donor chassis in a previous blog. This set of videos has me taking all the parts, both new, and refurbished, to build the amp.


In this first video you can see the parts all laid out on my bench. I am wiring up all the heaters and ground wires directly to the tube sockets.


In this second video I am installing the tag strip board, wiring up some of it, and then stuffing the custom painted faceplate with parts. The blue tape is to protect the paint job during the rest of assembly.


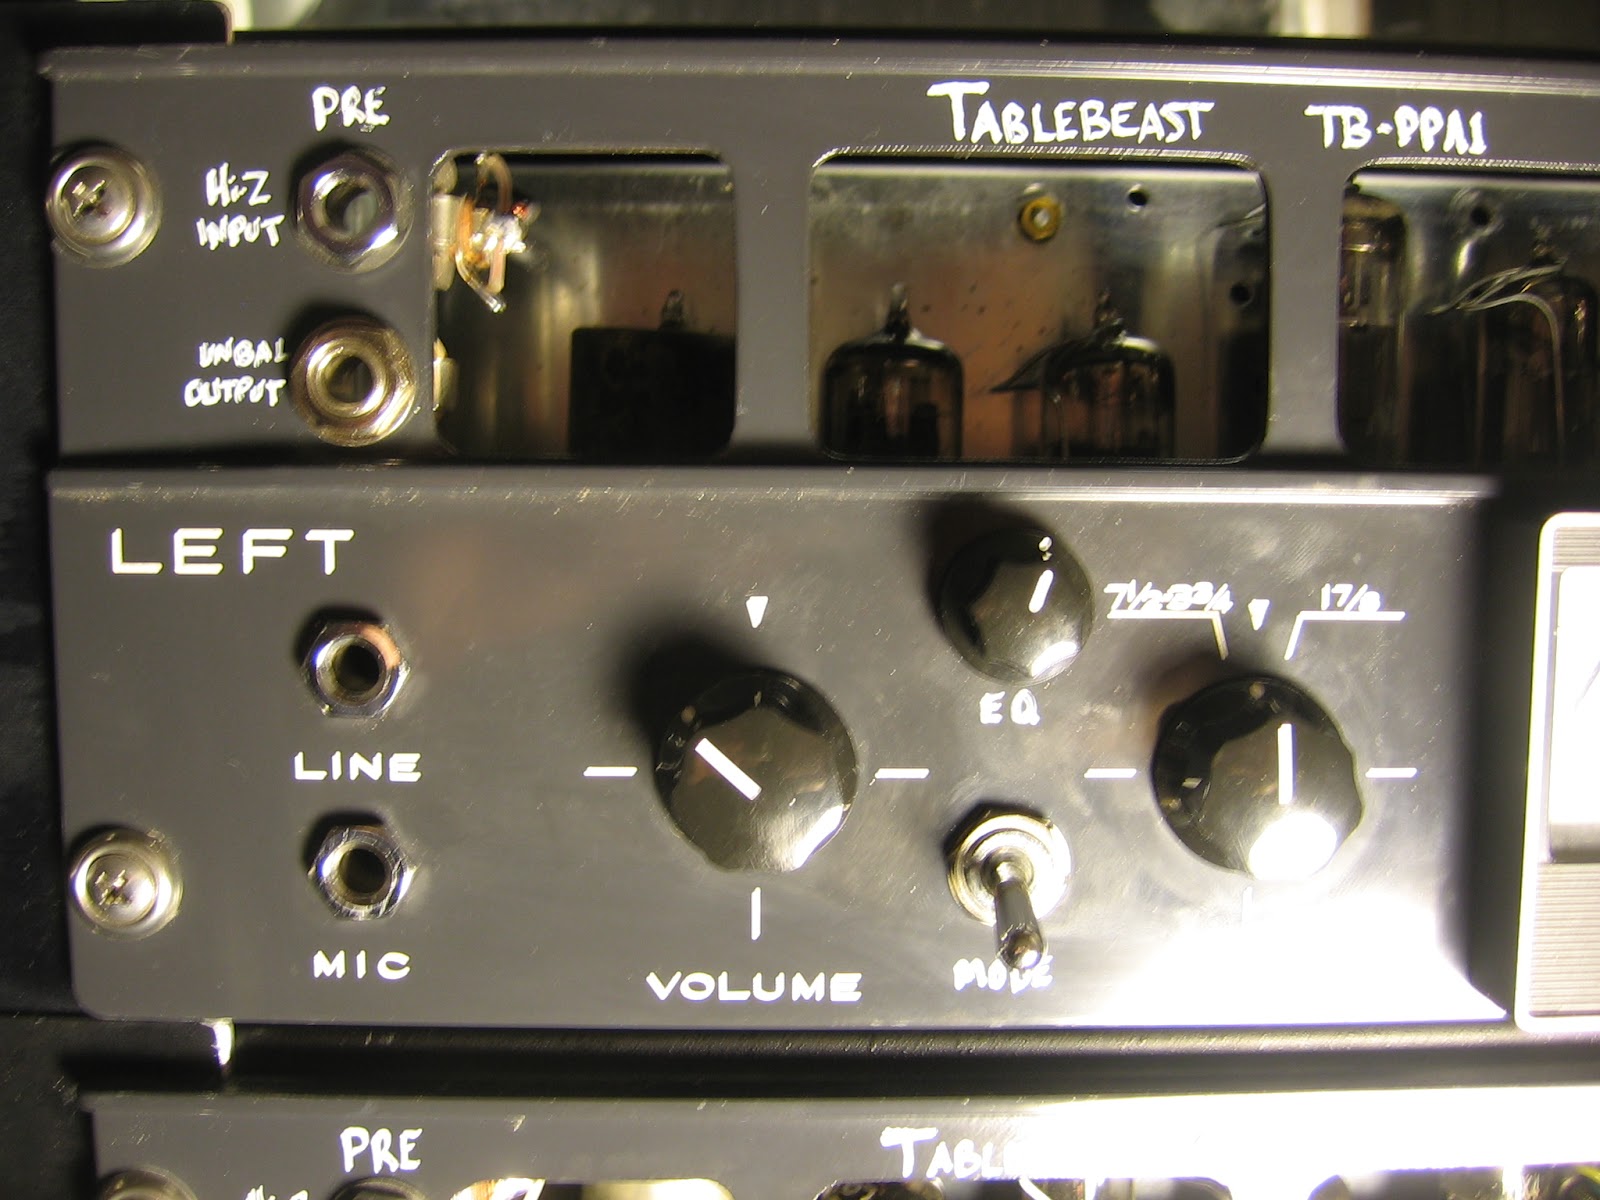
In this third video I am installing the faceplate, wiring it up, and installing some parts directly to the tube sockets.


In this fourth and final video I am finishing up this amp: wiring up the rest of the tag strip, controls, and tube sockets. All that is left now is knobs, tubes and a power cord and it is ready to test! I will be recording this amp over the weekend and posting samples soon. Oh yeah, and the schematic, as promised. I add a 25uf-25 volt electrolytic cap across the 820R resistor in the cathode follower (pre-EQ) for more bass if it will be used with a bass guitar, but otherwise this is the schem.


Tablebeast TB-PLX1 8 Watt Akai Roberts Monoblock Conversion, the Plexi8:

This amp is made reusing the chassis, choke, and transformers of an Akai / Roberts tube reel to reel monoblock. I also reuse, once refurbished: a few resistors, the tag board strip, some jacks, the meter, tube sockets and retainers, various screws and hardware. But all of the wiring, coupling caps, electrolytic caps, pots, knobs, some jacks, power switch, fuse block, and paint is new. The pictured case is made out of the original wood tape machine case sliced and reworked. The rubber feet and rear plate is also original Akai / Roberts. I can get the donor amps for $50 to $100 each currently plus shipping that also ranges whether I have someone send the whole thing or not. The tape transport is sacrificed to the metal recyclers for about $3. If anyone ever needs any transport parts let me know. I hate tossing them, but am forced to every once in a while when they pile up too much. This is all of the summer of 2012, so who knows where costs will go, but I add about $35 worth or parts. So, it is easy to get it done completely for under $150 and even under a hundred if you're lucky! All in with case building and all it is about 16 hours of labor for me, so expect twice that for a novice. But anyone could possibly build this as it is not difficult. Taking it apart really gives you a good idea of how to put it back  together. I have improved greatly on the strength and rigidity of my soldering, parts mounting technique. They just kind of flooded everything and stuck parts and wiring in the blobs. This has held up surprisingly well, but cold solder joints are more likely, especially with a slightly flexible tag strip board. I mount all my parts directly to the tag and then wrap my wiring around it all and crimp it tight making a full mechanical connection before a single drop of solder hits it. Luckily, because of the quickey way the original Akai builder made most of these units they are much easier they are to take apart. My finished mod would be a real beeotch to take apart completely compared to the original way it was built. It will still be easy to service of course, small repairs are no problem, but the way I build it, unless something smashes the board, it should work forever. Call my building style brick shithouse for lack of a better term, they are lightweight tanks. Maybe in 35 years you have to replace the electrolytic caps and of course tubes will come and go, but the finished product is like a sexy Japanese sports car of an amp. I keep the made-in-Japan tubes stuffed int here as much as I can help it as they just sound right! I've always been a sucker for an old Datsun, so I have a fond appreciation for Japanese engineering of the post war era. They were so far ahead of us for so long and held out longer before everyone started "value engineering" everything. Anyway, long story short: you can build a sweet amp cheap and have it last forever!

Wednesday, July 25, 2012

Time Lapse Footage of Akai Roberts Tube Monoblock Teardown, Desodler, and Cleanup


First up is the teardown itself. I am recording in time lapse mode at 1 frame per second. I have laid out the parts that I will keep and have thrown away the wiring and parts that I will not keep. I am using a Hakko 808 desoldering gun and a Hakko 936 soldering iron along with wire cutters, needlenose pliers, and a few screwdrivers.


Next I desolder and remove all solder from the joints, sockets, and tag strips. The solder is all sucked away by the Hakko 808. You can see me cleaning the 808 a few times to keep it working optimally.


And finally I use a chemical cleaner to remove all the dust, gunk, and filth from the chassis, sockets, and tag strip.

Notice all the parts I keep: hardware, tubes, sockets, jacks, meter, even resistors and some of the caps. Of course all of the wiring, electrolytic caps, ceramic caps, and tape-specific parts are recycled or trashed. The remaining parts are used in different combinations depending on what the amp is being used as a donor for.

Monday, July 23, 2012

Hammond Solovox Tube Synthesizer Hacking


Hammond Solovox Model L Tube Synthesizer:

Did I mention I was also going to have unique instruments available at XFMR? I will have synths of all kinds from ancient tube based to the modern virtual types. I like modular synths and will slowly be building my own from tube and solid state modules. In addition to recording bands with prepared material I would also like to have some jams with my unique gear. The experimentation possibilities are endless. I will then pull multitrack loops so folks (including myself of course) can take the best moments of the jams and make their own arrangements out of them. I just picked up this beauty from fleabay and I have big plans in store for it. In case you don't know what it is or didn't read the title, this is a Hammond Solovox. It is a monophonic tube synthesizer designed to attach to a Hammond organ and be used for solos. It uses a unique coil-based keyboard to control a single tube oscillator with multiple stages of octave dropping circuits that create a deeper and fuller sound. It has other cool stuff like a vibrato circuit a muting circuit, attack controls, multiple voicing layers via the octave circuits, and a neat output power amplifier with variable-mu 6SK7 tubes that drives a built-in speaker.

My plans are first to install a dummy load so the speaker can be switched off and then add a padded 1/4" output from the speaker level tap, probably with it's own trim control. I can make all the circuits modular where possible. I can bypass the internal oscillator and input an outside signal via a switched 1/4" jack feeding straight to the driver tube. Individual outputs and volume controls for the 4 voices, plus a direct preamplifier input would be nice to have. Some of the fixed values will be replaced with variable pots and condensers. There is plenty of room for a control panel behind the keyboard so some kind of wood panel there with big knobs and a few oversized switches would give me one heck of a mono-synth!


Wednesday, July 11, 2012

Akai Roberts Mod Sound Samples 1


Tablebeast TB-PPA1 Pre+Amp:

Here are some sounds that I have recorded with my modified Akai / Roberts tube units. First up is some electric guitar samples of the amp section of a Pre+Amp in drive mode. My friend Myers Gilmer plays his PRS with humbucker through into the amp section of the Tablebeast Pre+Amp with an EH Worm pedal on track 2. The amp is hooked up to a 1x12" cabinet with an EV speaker in it. A Shure SM57 is then plugged back into the Preamplifier section of the same Pre+Amp unit. That preamp is recorded through its transformerless output directly to 24 bit/44.1 khz wav file in a DAW. It is presented in mono with no effects or plug-ins or mastering AT ALL. Just RAW and naked Pre+Amp!


Next up are two complete songs by my good friend Daniel Moore from a project called "Crow Brings the Daylight". They both consist of vocals and acoustic/electric guitar. The vocals are sung directly into a Shure SM57 which is plugged into the Preamp section of the Pre+Amp with the pad engaged and the gain at a medium setting. The guitar is an Epiphone Chet Atkins CEC Classical Electric Guitar with Nylon Strings. It is plugged directly into one of my Plexi8 single-ended 8 watt amps. The amp is not hooked up to a speaker, but instead has it's dummy load engaged and is being recorded direct out of the padded line output tapped off the speaker load. The vocals are hard panned to the left and the acoustic is hard panned to the right. These are the absolutely unmolested tracks with no plug-ins or effects at all. No mastering or sweetening. This is the sound of the Akai units 100%.


The next track uses the same Pre+Amp and Plexi8 setup as the first, but this time the mic preamp has the pad off and the gain set to a medium setting and the amp is cranked up a bit more.


And here is the mixed and mastered version of those same two songs.

Sunday, July 1, 2012

What is a Magnecorder?


Magnecord M90:


Magnecord PT6-R Magnecorder:


 Magnecord M30 Magnecordette:

Magnecord, Manecorder, Magnecordette? There were many tape decks made by the company Magnecord following WWII. The most common models being the PT6-J Magnecorder and the M33 Magnecordette. I've had many of these units as well as different models that were related to these in addition to other one-offs and factory mods. Every time I think I've seen every tube design Magnecord made, two more pop up! In their day Magnecord competed with the best in the world.


They have fantastic build quality, are all point to point construction, easy to mod, and best of all: sound amazing once modified. I have used them stock as tape machines and they are solid and reliable with a great tone ONCE restored. Many have a lot of miles on the transports or rotting rubber parts that take their toll on proper function. Frankly all the units I have bought that did come with transports weren't worth the trouble to restore. Most are mono so to me they have little usefulness in a modern studio. Using them stock as straight up preamps or amplifiers works OK, but they are really not designed for this type of use. Much like using a stock Ampex 351 as a mic preamp: sure it will work and sounds cool, but it is really a one-trick pony. I don't like one-tricks. I prefer versatility. My hot rod amps can always do lots of stuff while keeping it simple and these Magncords take to my design philosophy SO well. 


So, for most of these units I like to reinvent them as completely different devices using only the original iron as inspiration for the replacement circuit. I have built PT6-J units into multi-functional boxes. One as a Pre+Amp unit has a one-bottle 12AV7 preamp using the original BEEFY stock input transformer sitting next to a guitar amp circuit using the rest of the chassis space. Of these units I have had several different amp permutations. One way to go is with a 6SJ7 pentode as the preamp stage for the guitar amp, but I have also used a 6SL7 dual triode cascaded to make similar amounts of gain with a totally different tone. The power section usually has a 6SL7 or 6SN7 LTP phase inverter feeding a PP pair of 6V6 or 5881 power tubes. This circuit uses the stock output transformer of course. The output transformer is great for recording purposes because it has two secondaries: one for speaker level with 4 and 16 ohm taps and the other can be used floating as a balanced 600 ohm output. It was originally for distribution over phone lines, but once heavily padded works great for the modern recording studio. I usually put a balanced u-pad of at least -20dB so that I don't blow up recorder inputs. 


Another mod I have done to the PT6-J is what I call my Pre+Limiter. It has the same one-bottle 12AV7 preamp circuit AND right next to it has a Federal AM-864/U Limiter circuit. These circuits can be used separately like on the Pre+Amp, but unlike that unit can also be wired directly together. I have coupled them in a few different ways. Originally I used a 10k:600 ohm output transformer for the preamp circuit output and wired it to a tap strip that was jumpered to a 600:10kCT input transformer on the Federal input. Later, while trying to simplify a later Pre+Limiter I decided to leave off the output transformer for the preamp circuit entirely and install a 10k:10kCT input transformer on the Federal. This made both circuits more compatible with my DAW environment because I could get more gain out of the preamp and LESS out of the Federal when using them separately AND they were mostly unaffected when used together because instead of a stepdown and stepup back to back it was just a 1:1 relationship. One less bit of iron is fine with me, there is PLENTY of color in the circuits already. All in all, Magnecords are some of my favorite mods, and despite their notoriety as of late are still fairly plentiful and the common models can be had cheap.  Of all the Maggie mods I have done to a dozen models or so none of them have been lacking: ALL of them have turned out fantastic. That said, don't spend too much on these things because you'll start driving the price up for me!