About a year ago I started messing with some EQ circuits for a new design that incorporated a microphone preamplifier and an EQ in one Akai donor module. I knew that for the preamp part of the device I wanted something totally different than my Brute Force Preamp, so I settled on the mic preamp circuit from the old Tube RCA Broadcast Consoles. It uses two 12AY7/6072 tubes and the circuit I prototyped years ago sounded great. It really is a completely different tone than the Brute Force, so it fit well with my plans. SO, for the EQ I wanted something a bit different: not the same old boring Pultec style for me. Instead I wanted to find the best PA-Style, 'James', 2-band EQ. I also wanted to incorporate some tone switching and a variable low cut filter. What I settled on was a hodge-podge of circuit bits. I used most of the 2-band circuit from the Bogen MXM mixer, a simple variable low cut circuit found on the net, a boost switch that moves the frequency band of the treble control down into the mid range a bit, and finally a 'Beef' switch that removes the negative feedback from the circuit and adds bypass caps to two cathode resistors simultaneously. I will post more details and a final schematic soon.
Don't worry, folks! I may have recently moved to the very edge of the Green River Gorge, but I have not yet fallen off the face of the Earth. I have so much new stuff that I have been brewing that I just can't WAIT to share it with all of you. New Akai / Roberts, Magnecord, Tape Delay (Ampro and Webcor) designs are simmering while I close out my waiting list for 2012. Look for some BIG moves come January! Pictures? Well, I do have pictures of my new place and my new tractor, er... truck.
Webcor Royalite model 2001-1C All Tube Reel to Reel:
I just bought this lovely mono, tube powered reel to reel off of an auction site. I saw a video on youtube where someone made a crude version of a tape delay with a similar deck. For my version I have some more detailed and involved plans to completely transform this unit into a full fledged tape delay with adjustable tape speed, microphone input (with transformer), preamp, simple mixer, and power section that drives a speaker. So, it will be a colored microphone preamp and low watt guitar amp in addition to being a tape delay! I am even working out how to modify the original little crystal mic to fit on a standard mic stand clip by adding a handle. I have two of these Webcor mics headed my way, so I may just wire them in series and or parallel as some kind of double-element mic. Of course this would be a very colored mic, but so is the preamp! Here is the original schematic.
Thanks to Dr. Zee of http://www.mzenertainment.com for scanning this schematic. Be sure to check out his site. If you like what I am doing here on this blog you'll love the amazing projects he has built for his own studio. I am really impressed and hope to get XFMR to that point soon.
Looking over this schematic, this unit is ripe for modification. All the tubes are driven by the power transformer, so no weird AC doubling circuit for power tube B+ like found in the Wollensak T-1500 units. The motor is an AC type and not a good candidate for adjustable speed, so right there I will have to start looking for a DC motor to replace it. My first order of business is to examine the schematics of dedicated tube tape delays like the Gibson Echoplex EP1 and EP2 to see what parts of this circuit I can toss. First thing to go is all the switching. The modified unit will have two modes: tape spinning as a delay and tape not spinning as a straight up amplifier. I will have a dedicated toggle switch that cuts the motor on and off and another toggle with a footswitch in parallel that mutes the delay circuit.
In my plans I would like to have just one extra playback head. No need for multitaps as that just gets more complicated. For controls I will keep it simple: preamp gain, feedback amount, dry level, wet level and of course a tape speed control. There will also be a 1/4" footswitch jack to round out the controls. I/O will include an XLR input with pad and phase switch, a Hi-Z input, speaker-level 8 ohm output, and a line level output. It has a built-in speaker, but I will have a switch that switches this to a dummy load when necessary. The reason for the XLR input is that this unit will be made for vocals in addition to instruments, so I figured if I remove the counting mechanism I will have plenty of room on the face for the female XLR jack.
Here are some additional pictures of the donor unit and a few other parts units that I bought mostly for their Webcor heads, but I am sure I will find other parts to vulture for this and the next unit. I am planning on building two of these: one for my good friend and patron Damiam Asker and one for the XFMR studio collection.
Webcor Regent model EP2006-1A:
This model is very similar to my main EP2001-1C unit and will make a fantastic parts donor.
Webcor Regent model GP2910-1
This last model has vastly different guts, thought it looks similar from the outside. It should still yield many great parts for this pair of mods.
For the longest time I have been focused solely on recording equipment with my tube projects. I used to really be into weird synthesizers back in my circuitbending days. My interest in synthesizers has been piqued lately so now I have come full circle back to them. This time of course I want to make them all out of tubes! This Metasonix Wretch Machine is made out of an awful lot of tubes, that is for sure! I opened the case up just to see what is going on under the hood and I saw not only tubes, but a few solid state bits in there as well. Based on Eric Barbour's DIY projects on Ken Stone's analog DIY synth site I can guess what is going on in there.
Where my designs will differ from these current Metasonix ones is that I will be using true all-tube designs. NO solid state anything in my planned designs! From the tube rectifier, to tube VCA, tube LFO, tube VCO, tube PWM, etc they will stay purely thermionic! I will start with some older TS series Metasonix circuits and tweak them to fit into my Akai/Roberts donor chassis. Anyway, here is the S-100 I currently have to mess around with. Unfortunately I have to sell it, but it will be replaced with my very own modular tube synth based on similar circuits.
By the way, these circuits run on Hz/v CV so I am looking for a Yamaha CS5, CS10, or CS15 to use as a controller. Let me know if you have one of these beasts at a reasonable price. Even if it is broken I can probably fix it.
This is a jam that a friend of mine did using the Wretch for the very first time:
I have been tearing through my waiting list and trying to get to zero so I can begin the studio gear in earnest. I haven't had much time to update the blog here in a bit. I do have some new pics taken by my friend Patrick Olin. So, for now, enjoy.
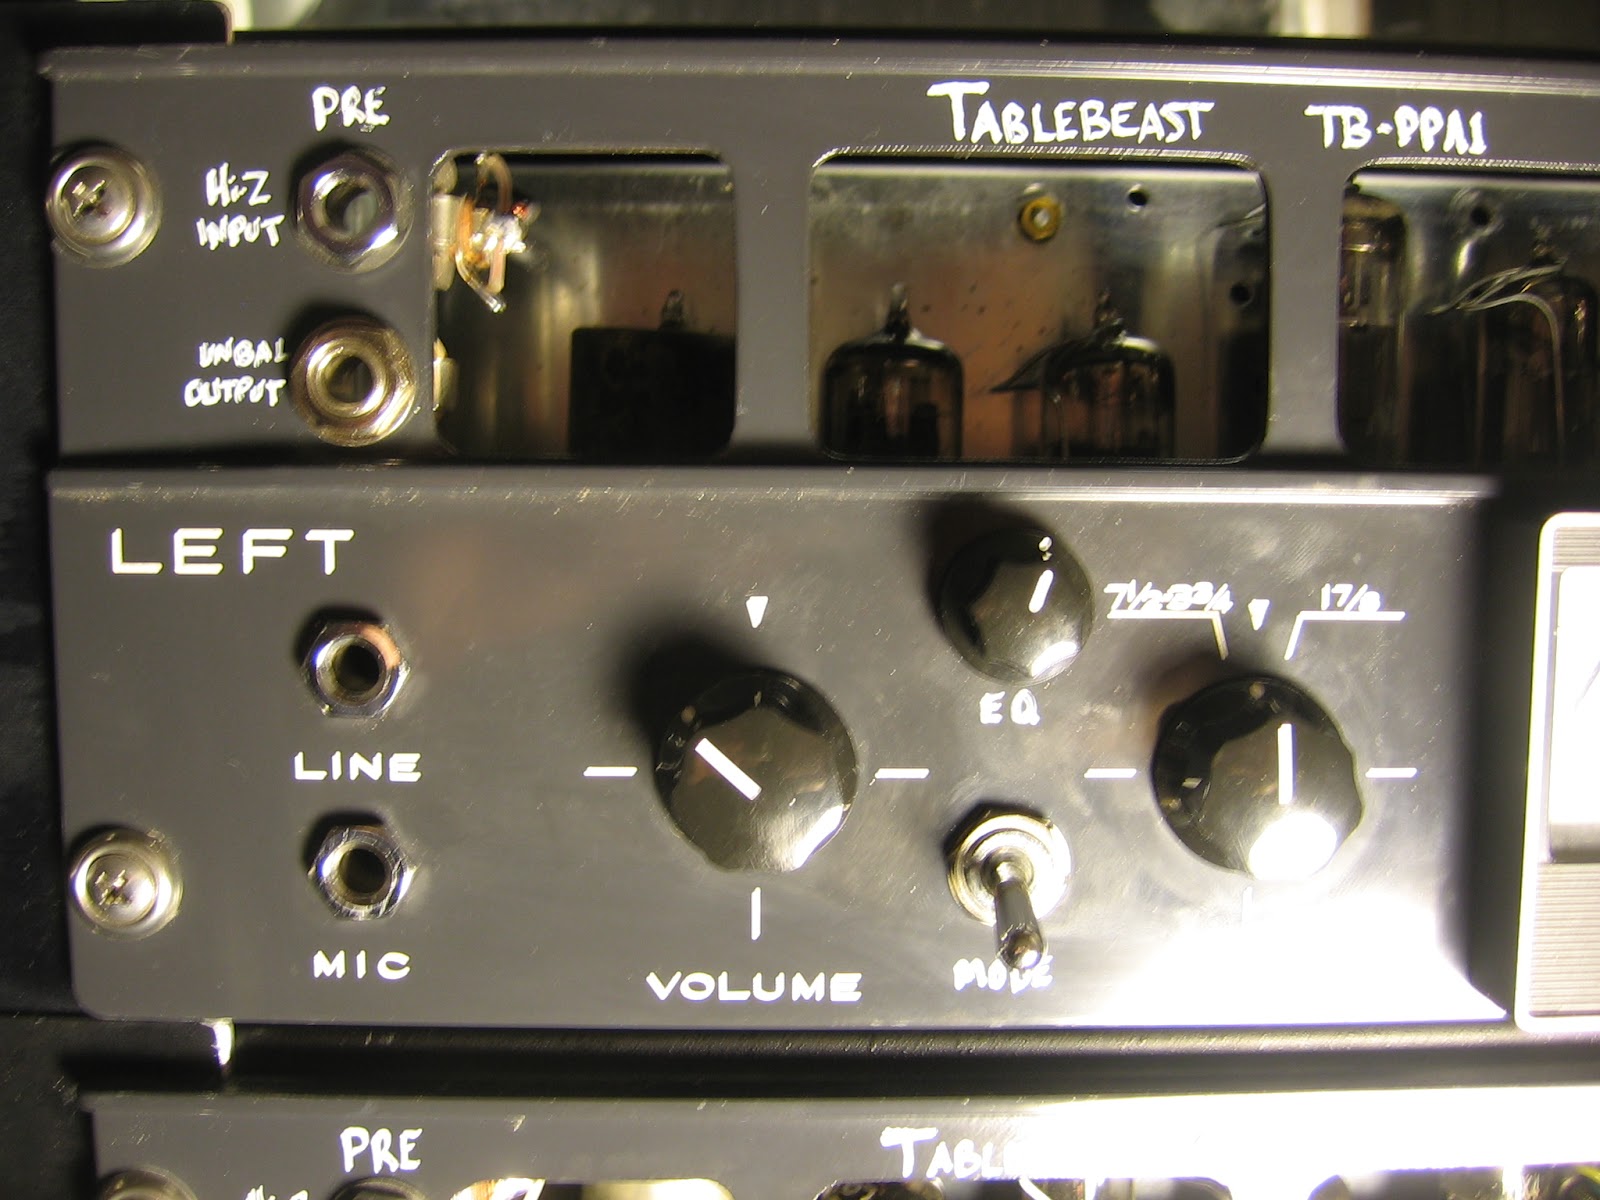
Tablebeast TB-PPA1 Pre+Amp, front 3/4 view:
Tablebeast TB-PPA1 Pre+Amp, rear view:
Tablebeast TB-PPA1 Pre+Amp, bottom view:
Tablebeast TB-PPA1 Pre+Amp, bottom 3/4 view:
Tablebeast TB-2XP1 2x Preamp, front 3/4 view:
Tablebeast TB-2XP1 2x Preamp, rear 3/4 view:
Tablebeast TB-PLX1 Plexi8, front 3/4 view:
Tablebeast TB-PLX1 Plexi8, rear 3/4 view:
Tablebeast TB-2XP1 2x Preamp, front 3/4 view:
Tablebeast TB-2XP1 2x Preamp, rear 3/4 view:
Tablebeast TB-PPA1 Pre+Amp AND TB-PLX1 Plexi8 in wood case, case closed front 3/4 view:
Tablebeast TB-PPA1 Pre+Amp AND TB-PLX1 Plexi8 in wood case, case open front 3/4 view:
Tablebeast TB-PPA1 Pre+Amp AND TB-PLX1 Plexi8 in one-of-a-kind case, rear 3/4 view:
Tablebeast TB-PLX1 Plexi8, front 3/4 view:
Tablebeast TB-PLX1 Plexi8, rear 3/4 view:
So here they are, my most recent Akai Roberts Tube monoblock conversions from August. Please leave comments here and I will try to reply to all of them.
Here are some live tracking samples. A few friends were jamming while I was finishing up some mods so I just threw up some mics. Very loose recording as a result of course, but it will show you various tones you can get with this stuff. There is no editing, effects, or any kind of manipulation whatsoever on these tracks. Faders were set to zero and elements hard panned. That's it, there aren't even fade ins or outs. Track description tells you what the elements are and how they were tracked.
I just got a fantastic score of fleabay yesterday. It was a lot of three Ampex reel to reel tube amplifiers. One is a 601 unit and the other two are 602 units. The 602 pair both have their stock input and output transformers installed in place, but the 601 is missing its plug-in input transformer. I really like both of these units. The 601 has a tube rectified power supply for high voltage and will have an artificially center tapped AC source for the 6.3v heaters. Nothing wrong with AC heaters is you do them right to cancel out the hum. The 602 has a power supply is completely different from the 601. It uses a solid state rectified voltage doubler circuit for high voltage and a solid state rectified DC for the heaters. I usually tune it to be slightly cold at around 6 volts. The sounds of the two units are slightly different despite having identical audio circuits. Because of the tube PSU the 601 has a softer edge and feels silkier overall. The 602 with its solid state PSU has slightly more gain + headroom and is tighter overall. It is a little more aggressive and gives up the softer edges of the 601. It is an interesting trade-off and I like to have both on hand for the different sounds. I have used them interchangeably on just about any source and it really just comes down to personal taste.
My plans are to make each unit a two channel microphone preamp with XLR microphone and 1/4" DI inputs as well as dual outputs: one will be transformer balanced on an XLR jack and the other will be impedance balanced on a 1/4" TRS jack. One of the 602 units will get the stock input and output transformers from both 602s while the other 602 and the 601 will get Jensen input and output transformers throughout. All three will be put up for sale to raise funds for the station. If you are interested please inquire for pricing and availability.
Here are some time lapse videos showing the installation of both the standard and deluxe kits.
Standard Yamaha PM1000 Recap/EQ Mod Kit Install:
In this first video you can see me removing the old caps and installing fresh Wima films to replace the tantalum caps for coupling/high pass and the poly caps with updated values for EQ. I am alos replacing all the electrolytic with Nichicon Audio series in much higher values. I also replace the old crappy ceramic caps with modern MLCC types. This gives better tone and a broader frequency response.
Deluxe Yamaha PM1000 Recap/EQ Mod Kit Install:
The deluxe kit is the same as the standard kit, except it takes about 60% longer to install and that is because include film bypass caps across all the electrolytics on the screenprinted circuit board side.
No post in a little while here. I don't want anyone to think I'm running out of steam or losing interest. Far from it! I have been hip deep in plans for an upcoming Kickstarter campaign, plus I am working down the very last of my waiting list and trying to 'get to zero' where I have filled all current orders so I can begin building my rig. I should be there this week. And the Kickstarter campaign should be ready to launch once I get the video finished. I've got just about everything else ready to go! [The hardest thing is to distill the hundreds of ideas I have for the station/label down to the basics and then find a way to explain it properly to people. Since it is not really a radio station or a record label and it is non-profit, but takes no funds from the government it has been difficult to figure out how to present it. I'm getting there. Still it is lots and lots of work for no money, but man will it be cool once I get this thing off the ground! In the mean time if anyone wants to help out the cause by having me convert one of your Akai, Magnecord or Ampex tube monoblocks I sure could use some funds to get this ball rolling!
Here are some more time-lapse videos of one of my builds. This one is of me building one of my original designs, an 8 watt, single ended, Plexi style guitar amp out of an Akai Roberts tube monoblock amp from one of their 60's reel to reel decks. I did the teardown, desoldering, and cleanup of the donor chassis in a previous blog. This set of videos has me taking all the parts, both new, and refurbished, to build the amp.
In this first video you can see the parts all laid out on my bench. I am wiring up all the heaters and ground wires directly to the tube sockets.
In this second video I am installing the tag strip board, wiring up some of it, and then stuffing the custom painted faceplate with parts. The blue tape is to protect the paint job during the rest of assembly.
In this third video I am installing the faceplate, wiring it up, and installing some parts directly to the tube sockets.
In this fourth and final video I am finishing up this amp: wiring up the rest of the tag strip, controls, and tube sockets. All that is left now is knobs, tubes and a power cord and it is ready to test! I will be recording this amp over the weekend and posting samples soon. Oh yeah, and the schematic, as promised. I add a 25uf-25 volt electrolytic cap across the 820R resistor in the cathode follower (pre-EQ) for more bass if it will be used with a bass guitar, but otherwise this is the schem.
Tablebeast TB-PLX1 8 Watt Akai Roberts Monoblock Conversion, the Plexi8:
This amp is made reusing the chassis, choke, and transformers of an Akai / Roberts tube reel to reel monoblock. I also reuse, once refurbished: a few resistors, the tag board strip, some jacks, the meter, tube sockets and retainers, various screws and hardware. But all of the wiring, coupling caps, electrolytic caps, pots, knobs, some jacks, power switch, fuse block, and paint is new. The pictured case is made out of the original wood tape machine case sliced and reworked. The rubber feet and rear plate is also original Akai / Roberts. I can get the donor amps for $50 to $100 each currently plus shipping that also ranges whether I have someone send the whole thing or not. The tape transport is sacrificed to the metal recyclers for about $3. If anyone ever needs any transport parts let me know. I hate tossing them, but am forced to every once in a while when they pile up too much. This is all of the summer of 2012, so who knows where costs will go, but I add about $35 worth or parts. So, it is easy to get it done completely for under $150 and even under a hundred if you're lucky! All in with case building and all it is about 16 hours of labor for me, so expect twice that for a novice. But anyone could possibly build this as it is not difficult. Taking it apart really gives you a good idea of how to put it back together. I have improved greatly on the strength and rigidity of my soldering, parts mounting technique. They just kind of flooded everything and stuck parts and wiring in the blobs. This has held up surprisingly well, but cold solder joints are more likely, especially with a slightly flexible tag strip board. I mount all my parts directly to the tag and then wrap my wiring around it all and crimp it tight making a full mechanical connection before a single drop of solder hits it. Luckily, because of the quickey way the original Akai builder made most of these units they are much easier they are to take apart. My finished mod would be a real beeotch to take apart completely compared to the original way it was built. It will still be easy to service of course, small repairs are no problem, but the way I build it, unless something smashes the board, it should work forever. Call my building style brick shithouse for lack of a better term, they are lightweight tanks. Maybe in 35 years you have to replace the electrolytic caps and of course tubes will come and go, but the finished product is like a sexy Japanese sports car of an amp. I keep the made-in-Japan tubes stuffed int here as much as I can help it as they just sound right! I've always been a sucker for an old Datsun, so I have a fond appreciation for Japanese engineering of the post war era. They were so far ahead of us for so long and held out longer before everyone started "value engineering" everything. Anyway, long story short: you can build a sweet amp cheap and have it last forever!
First up is the teardown itself. I am recording in time lapse mode at 1 frame per second. I have laid out the parts that I will keep and have thrown away the wiring and parts that I will not keep. I am using a Hakko 808 desoldering gun and a Hakko 936 soldering iron along with wire cutters, needlenose pliers, and a few screwdrivers.
Next I desolder and remove all solder from the joints, sockets, and tag strips. The solder is all sucked away by the Hakko 808. You can see me cleaning the 808 a few times to keep it working optimally.
And finally I use a chemical cleaner to remove all the dust, gunk, and filth from the chassis, sockets, and tag strip.
Notice all the parts I keep: hardware, tubes, sockets, jacks, meter, even resistors and some of the caps. Of course all of the wiring, electrolytic caps, ceramic caps, and tape-specific parts are recycled or trashed. The remaining parts are used in different combinations depending on what the amp is being used as a donor for.
Did I mention I was also going to have unique instruments available at XFMR? I will have synths of all kinds from ancient tube based to the modern virtual types. I like modular synths and will slowly be building my own from tube and solid state modules. In addition to recording bands with prepared material I would also like to have some jams with my unique gear. The experimentation possibilities are endless. I will then pull multitrack loops so folks (including myself of course) can take the best moments of the jams and make their own arrangements out of them. I just picked up this beauty from fleabay and I have big plans in store for it. In case you don't know what it is or didn't read the title, this is a Hammond Solovox. It is a monophonic tube synthesizer designed to attach to a Hammond organ and be used for solos. It uses a unique coil-based keyboard to control a single tube oscillator with multiple stages of octave dropping circuits that create a deeper and fuller sound. It has other cool stuff like a vibrato circuit a muting circuit, attack controls, multiple voicing layers via the octave circuits, and a neat output power amplifier with variable-mu 6SK7 tubes that drives a built-in speaker.
My plans are first to install a dummy load so the speaker can be switched off and then add a padded 1/4" output from the speaker level tap, probably with it's own trim control. I can make all the circuits modular where possible. I can bypass the internal oscillator and input an outside signal via a switched 1/4" jack feeding straight to the driver tube. Individual outputs and volume controls for the 4 voices, plus a direct preamplifier input would be nice to have. Some of the fixed values will be replaced with variable pots and condensers. There is plenty of room for a control panel behind the keyboard so some kind of wood panel there with big knobs and a few oversized switches would give me one heck of a mono-synth!
Here are some sounds that I have recorded with my modified Akai / Roberts tube units. First up is some electric guitar samples of the amp section of a Pre+Amp in drive mode. My friend Myers Gilmer plays his PRS with humbucker through into the amp section of the Tablebeast Pre+Amp with an EH Worm pedal on track 2. The amp is hooked up to a 1x12" cabinet with an EV speaker in it. A Shure SM57 is then plugged back into the Preamplifier section of the same Pre+Amp unit. That preamp is recorded through its transformerless output directly to 24 bit/44.1 khz wav file in a DAW. It is presented in mono with no effects or plug-ins or mastering AT ALL. Just RAW and naked Pre+Amp!
Next up are two complete songs by my good friend Daniel Moore from a project called "Crow Brings the Daylight". They both consist of vocals and acoustic/electric guitar. The vocals are sung directly into a Shure SM57 which is plugged into the Preamp section of the Pre+Amp with the pad engaged and the gain at a medium setting. The guitar is an Epiphone Chet Atkins CEC Classical Electric Guitar with Nylon Strings. It is plugged directly into one of my Plexi8 single-ended 8 watt amps. The amp is not hooked up to a speaker, but instead has it's dummy load engaged and is being recorded direct out of the padded line output tapped off the speaker load. The vocals are hard panned to the left and the acoustic is hard panned to the right. These are the absolutely unmolested tracks with no plug-ins or effects at all. No mastering or sweetening. This is the sound of the Akai units 100%.
The next track uses the same Pre+Amp and Plexi8 setup as the first, but this time the mic preamp has the pad off and the gain set to a medium setting and the amp is cranked up a bit more.
And here is the mixed and mastered version of those same two songs.
Magnecord, Manecorder, Magnecordette? There were many tape decks made by the company Magnecord following WWII. The most common models being the PT6-J Magnecorder and the M33 Magnecordette. I've had many of these units as well as different models that were related to these in addition to other one-offs and factory mods. Every time I think I've seen every tube design Magnecord made, two more pop up! In their day Magnecord competed with the best in the world.
They have fantastic build quality, are all point to point construction, easy to mod, and best of all: sound amazing once modified. I have used them stock as tape machines and they are solid and reliable with a great tone ONCE restored. Many have a lot of miles on the transports or rotting rubber parts that take their toll on proper function. Frankly all the units I have bought that did come with transports weren't worth the trouble to restore. Most are mono so to me they have little usefulness in a modern studio. Using them stock as straight up preamps or amplifiers works OK, but they are really not designed for this type of use. Much like using a stock Ampex 351 as a mic preamp: sure it will work and sounds cool, but it is really a one-trick pony. I don't like one-tricks. I prefer versatility. My hot rod amps can always do lots of stuff while keeping it simple and these Magncords take to my design philosophy SO well.
So, for most of these units I like to reinvent them as completely different devices using only the original iron as inspiration for the replacement circuit. I have built PT6-J units into multi-functional boxes. One as a Pre+Amp unit has a one-bottle 12AV7 preamp using the original BEEFY stock input transformer sitting next to a guitar amp circuit using the rest of the chassis space. Of these units I have had several different amp permutations. One way to go is with a 6SJ7 pentode as the preamp stage for the guitar amp, but I have also used a 6SL7 dual triode cascaded to make similar amounts of gain with a totally different tone. The power section usually has a 6SL7 or 6SN7 LTP phase inverter feeding a PP pair of 6V6 or 5881 power tubes. This circuit uses the stock output transformer of course. The output transformer is great for recording purposes because it has two secondaries: one for speaker level with 4 and 16 ohm taps and the other can be used floating as a balanced 600 ohm output. It was originally for distribution over phone lines, but once heavily padded works great for the modern recording studio. I usually put a balanced u-pad of at least -20dB so that I don't blow up recorder inputs.
Another mod I have done to the PT6-J is what I call my Pre+Limiter. It has the same one-bottle 12AV7 preamp circuit AND right next to it has a Federal AM-864/U Limiter circuit. These circuits can be used separately like on the Pre+Amp, but unlike that unit can also be wired directly together. I have coupled them in a few different ways. Originally I used a 10k:600 ohm output transformer for the preamp circuit output and wired it to a tap strip that was jumpered to a 600:10kCT input transformer on the Federal input. Later, while trying to simplify a later Pre+Limiter I decided to leave off the output transformer for the preamp circuit entirely and install a 10k:10kCT input transformer on the Federal. This made both circuits more compatible with my DAW environment because I could get more gain out of the preamp and LESS out of the Federal when using them separately AND they were mostly unaffected when used together because instead of a stepdown and stepup back to back it was just a 1:1 relationship. One less bit of iron is fine with me, there is PLENTY of color in the circuits already. All in all, Magnecords are some of my favorite mods, and despite their notoriety as of late are still fairly plentiful and the common models can be had cheap. Of all the Maggie mods I have done to a dozen models or so none of them have been lacking: ALL of them have turned out fantastic. That said, don't spend too much on these things because you'll start driving the price up for me!
I thought I'd share some of my past PA amp conversions. I have not kept very good records or notes of this stuff. So in most cases I am just writing from memory. Most of these were PA amps that drive speakers, but a few of them were mixers designed to be used with a separate power amp. Most of the mods were based on keeping the stock power and output transformers in place and using the power sections mostly stock. I nearly always change out the weaker driver/inverter stages for my favorite long-tail pair type setup. The bulk of the changes are getting rid of stupid grid-leak bias preamps and tone stacks designed for program material instead of instruments. Even when I do keep stock bits of circuits, I always rewire anyway just so I am sure everything is put together correctly.
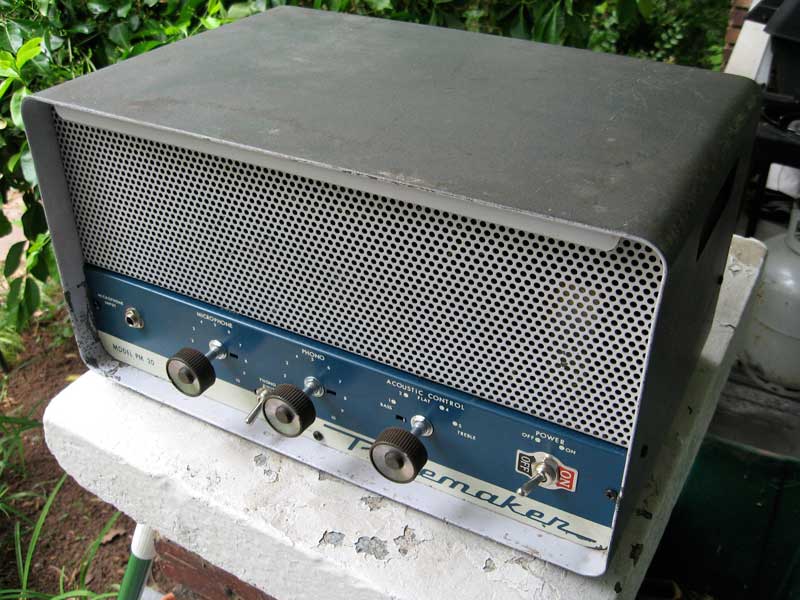
Bell Pacemaker 20:
This was an early mod. It wound up needing a replacement power transformer. I think I put some kind of deluxe hybrid circuit in there. I think it had two 6AV6 preamp tubes, one 12AX7 driver/phase inverter tube, and two 6V6 power tubes. There are volume, treble and bass controls. Mode switch that did something cool, I can't remember exactly what right now.
Bogen J330:
I've done two of these. They make insanely great guitar amps. It has all octal socketed tubes, so I took a Bassman/Plexi type circuit and adapted it for 6SF5 preamp, 6SL7 driver, and coke bottle 6L6G tubes. One of my first paint experiments as well.
Precision Electronics (Grommes) Mixer:
This was originally a line level tube mixer so this one doesn't have a power section. It is essentially the preamp and tone stack from my version of the Bassman/Plexi with a two-band EQ. It also has an extra drive circuit. Stick it in front of even the cheesiest amp and have full tone!
Bogen CHA-10:
This amp was ready for a champ-like treatment. At first I set up the 6AV6 and single ended 6L6 as a mostly stock power section. The interesting bit comes with the preamplifier stage. Originally I had the 6AU6 set up as a pentode, but the gain was just WAY too high, so I triode strapped it and all was well. Single volume control (microphone) and the tone control (phono) is just my favorite simple high end boost or cut. The tone switch is a mode control that implements or removes a negative feedback loop, taking the amp from tame to wild.
Newcomb Pathfinder 10:
This amp had a very odd stock circuit. It had a 6AU6 pentode and half of a 12AX7 acting together as a phase inverter. I got rid of all that weird stuff and installed a deluxe type circuit in here. Single input, gain control, and treble/bass controls. '10' watts of sweetness
Magnasync Moviola Squawk Box:
I installed essentially the Jekyll & Hyde amp circuit in this lovely little box. It was a beeitch trying to get the internal speaker to keep from rattling, but once I did this was a solid combo amp that had a surprising amount of power. I hooked it up to a full stack of 8x12" speakers once and it was plenty loud enough to keep up with a whole band. Not bad for a 6AQ5 single-ended power section!
Bogen CHB-10A:
Another donor with the Jekyll & Hyde circuit. Though this one has a solid-state power supply and a 7868 power tube so it has a very different vibe. I've made 4 of these and they have all turned out amazing. So simple I think I could mod one from start to finish in less time than it takes to watch the original Star Wars trilogy. (That includes teardown, drilling, total rewire and recap, and basic testing!)
Stromberg-Carlson Mixer Model 38:
Another very early project for me. I think this was the last time I kept the original can caps installed. They worked great for a while, until one day when they failed and fried up the power transformer and nearly started a fire. I reworked it with a new transformer and all new caps. Lesson learned. The circuit was still pretty much stock. It had four mic inputs and one transformer balanced line output. Great tone with way too much gain! EQ section was subtle but cool.
None of these beauties is still in my collection. They were all sold long ago to further the cause. I just thought I'd share some of the past to help show the evolution to the present. I have several similar amps awaiting mods for the station, so stay tuned.


N0heBQBHc6Swjw~~60_57.jpg)


kE9s4,!!WIBQBHb3H,h!~~60_57.jpg)