Tuesday, October 7, 2014

Fun New Design: Newcomb E10B Rack Mixer Amplifier turned into Ultimate Vocal Amp!


Newcomb E10B, Tablebeast Modified TB-E10B Mixer Amplifier:

So I have this friend that is a singer. He is loud. I mean he is LOUD. LOOOUUUDDDD. Seriously every single time I sound check him, no matter how loud I can get him to check, he will always come back and go louder later in a show or session. So, I wanted to devise an amp that had a genuine brick wall for this guy. And a wall that will compress using amp compression rather than a true limiter or compressor. I also wanted to have a few other unique abilities. I wanted a mic level input for one channel, a balanced line level input (that fed the same circuit as the mic input, but with a 1:1 input transformer instead of a 1:15), and an unbalanced bridge input. The mic input is for a "drive mic" that can be set up as an effects-free overdriven sound (for screams and contrast vocals). It can also be used as a DI or a mic on a guitar for solo performances. The balanced line input is fed by a Voco Loco. The singer uses guitar pedals with this neat device and the output of it is balanced XLR so it feeds right into this input. The last input, the bridging one is simply for playback input for when he is practicing and working along with his iPod. So its nice and clean no matter what.

This thing also has two outputs. One of them is the speaker output of course, but the 1/4" speaker jack has a built in dummy load so you can run it it with or without a speaker attached. The OTHER output takes the 75 volt speaker tap that is normally unused and taps it, feeds it to a pad, and then to a 600:600 output transformer. This output transformer is the main output and the signal that the singer gives to the sound guy. One last feature is a footswitch with local switch override. This goes to the feedback circuit and literally turns the feedback loop on and off. That way you've got a clean sound and a gnarly driven sound that is easily switched back and forth to with no popping.

So, all together the singer can create a complex tone himself and have it be consistent throughout all venues. He gives the sound guy one cable that has his finished sound ready to go.

Oh yeah, I'll get some better pics, it has a nice mural and a custom case for it now.


Tuesday, April 9, 2013

Magnecord PT6-J Made into Preamp plus Vari-Mu Tube Compressor / Limiter "Pre+Limiter"


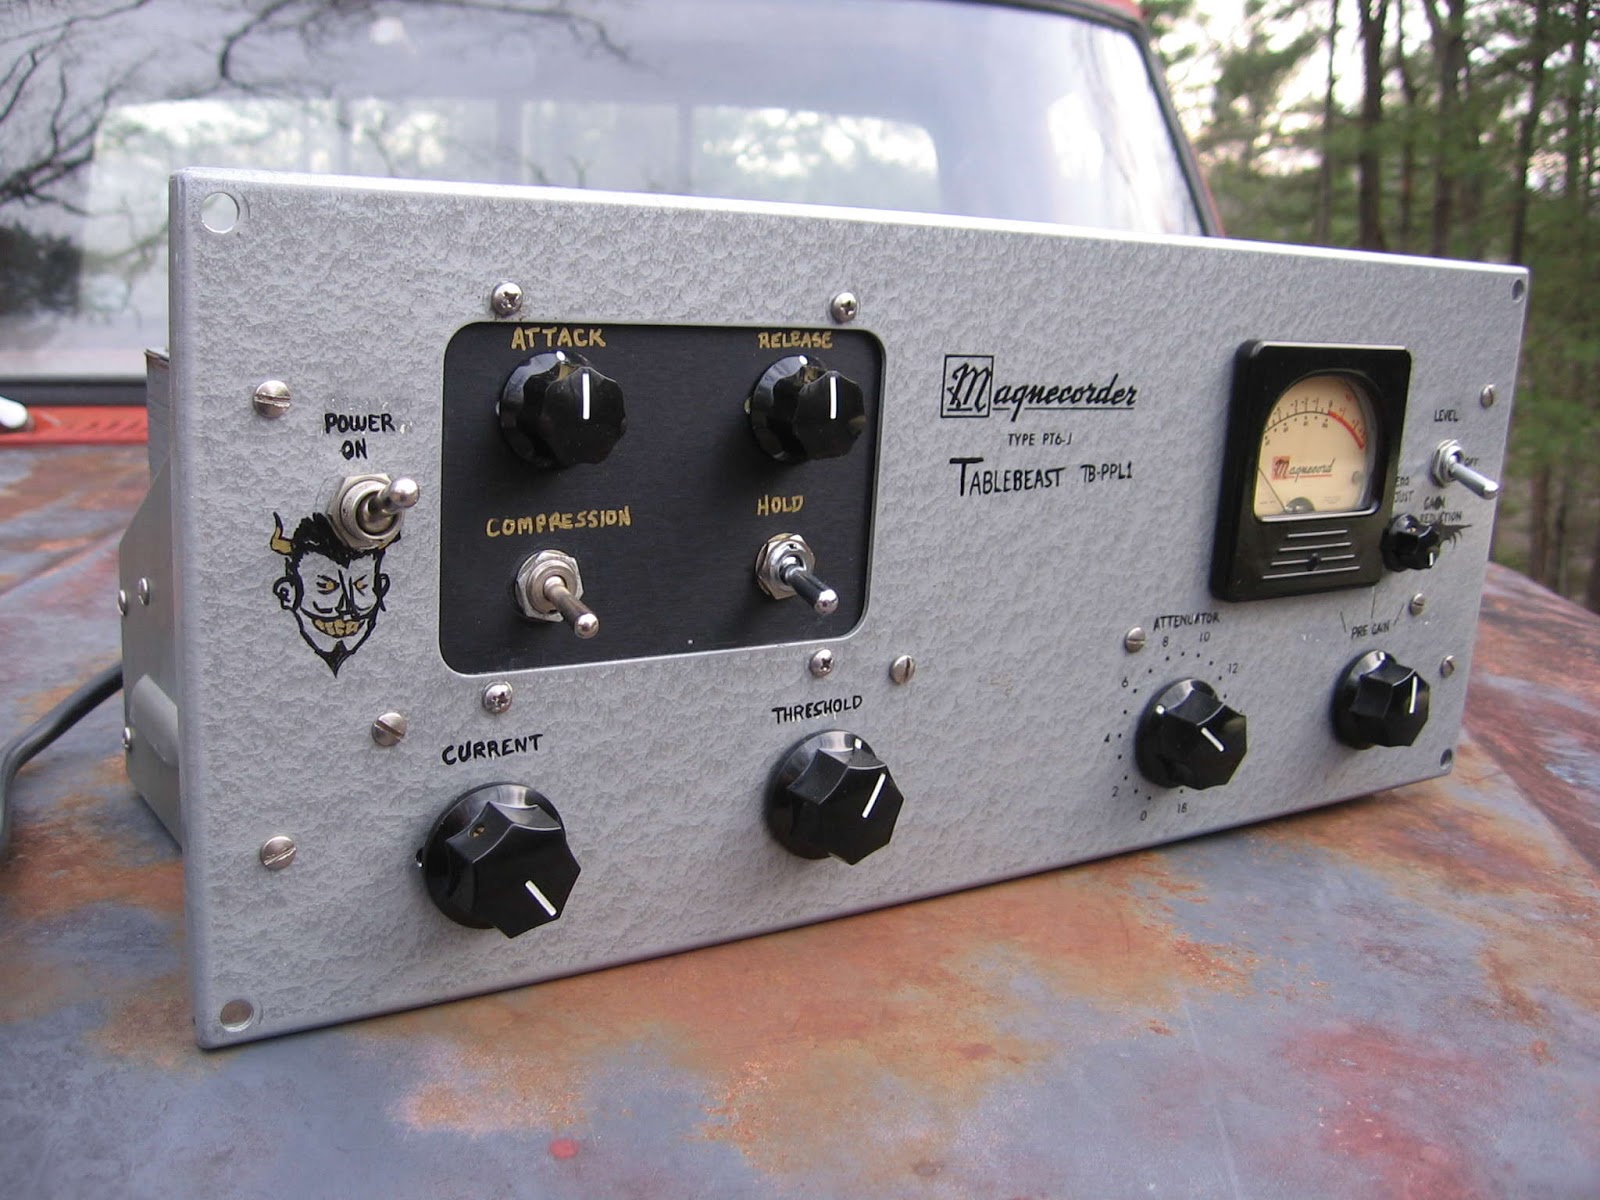
Tablebeast Magnecord PT6-J TB-PPL1 Pre+Limiter:

Whoohoo! I finally got this one finished last week and it turned out marvelous! The new owner is tickled with its amazing performance. I remember when he first asked me (based on this blog) if the new circuits I installed would be better and/or more useful than the stock Magnecord PT6-J with a simple restoration. I laughed a bit and told him that OH YEAH it will be better! Now that he has it back in his hands, he knows what I am talking about.

So, I start out with a simple preamp circuit using a single 12AV7. It is a rather popular DIY design made popular at "The Lab" and originally designed by a fella named NYDave. I have tweaked his circuit out a bit but it is still the same basic idea. One of my changes is that I am using the 18v volt tap that originally was used to power the 5879 and 12SJ7 with DC heaters. I reconfigure it to have two filter stages and knock the voltage down to 12 volts to run the single 12AV7. With the amazing triad input transformer that was already on-board I change its configuration a bit by pulling the primary center tap from ground, making it a floating input. Then I add a 1/4" DI input, a -20dB pad, and a phase reversal switch. The unbalanced, transformerless output of this circuit goes to the tag strip on the rear of the unit.

Then to this lovely preamp circuit I add a Vari-Mu Compressor / Limiter that started out as a Federal AM-864/U circuit. I performed quite a few mods to this circuit and thought it really isn't much of a Federal any more, it still retains the special flair that the Fed has, just with a LOT more adjustable parameters. I moved the sidechain from the first stage to the second, giving it a lot more control over threshold. I also added attack and release controls as well as a compression and hold switch. The compression switch turns the mu-line on or off so that it an be used straight up as a line amp or as a compressor. The hold switch is very cool. It essentially holds the compression at its highest amount by removing the release function entirely. This can be cool for keeping stuff that is crushed, fully crushed full-time. I have also added pin jacks and locking trim pots to match the two 6SK7 tubes for optimum operation. I have added a really sweet transformer to the venerable Magnecord lineup as an input/interstage. Magnetic Components of Chicago have a ClassicTone line of transformers and one of their models is 40-18093. It is a designed to be a clone of the interstage/phase splitter transformer from the Fender Musicmaster Bass amp. It has a nice high impedance primary which couples very well with the preamp stage. The secondary has a slight stepup with a center tap. The mu-line goes to this center tap and the two secondary lines each feed to the input attenuator which goes to the pair of 6SK7 remote-cutoff tubes. I will be using this iron on all my vari-mu compressors going forward because it performs perfectly in this capacity. Plus, it doesn't hurt that it is a nice beefy unit with decent shielding and attached wiring. It fits right in with the massive Triad iron. Speaking of which the output transformer, which is designed as an output ready to handle the power of a pair of 6V6GT tubes, it has a balanced 600 ohm output in addition to the single ended 4 and 16 ohm taps meant for hooking up to a speaker. Well, here I have disconnected the 4 and 16 ohm taps, grounded their common tap and floated the 600 ohm taps. These have a 604 ohm resistor strapped across them to knock down the gain just a bit, but there is also a -15dB output pad on a switch that knocks it down even further. This switch is pretty much on any time I hook up to a digital system, but the switch is there in case you're feeling brave or are smacking the shit out of some high headroom tape! The limiter output goes to the XLR male jack originally used as a tape recorder interface. The input is hooked up tot he tag strip and I have it set up so that the output of the preamp circuit is patched directly to the input of the limiter circuit. The beauty of using the tag strip like this is that if you WANT to decouple the two circuits and use them separately (or add another device in between the two circuits, OR just bypass the preamp circuit for line-level work), this is as easy as turning a few flathead screws.

I am very proud of this new creation. I made a few of these before with a stock Federal circuit and though they were great, this new iteration is something special. This PT6-J is MADE for this type of conversion and I would put this Federalish mod up against ANY stock Fed and wipe the floor with it. Plus, it comes with an amazing microphone preamp on board as well and that adds a whole 'nother dimension to what it can do as a standalone channel strip. The iron is really what puts it over the top. Check out the puny transformers on the original and you'll see what I mean. Where the original was not really designed to be a studio tool, THIS one certainly IS! I may put one up on evilBay soon, so if you are interested in getting one for yourself maybe we can bypass that whole process and deal directly. OK, so here is a pile of pictures showing off the unit from all angles.


Thursday, February 28, 2013

Ampex 602 2 Ch Brute Force Preamp Conversion


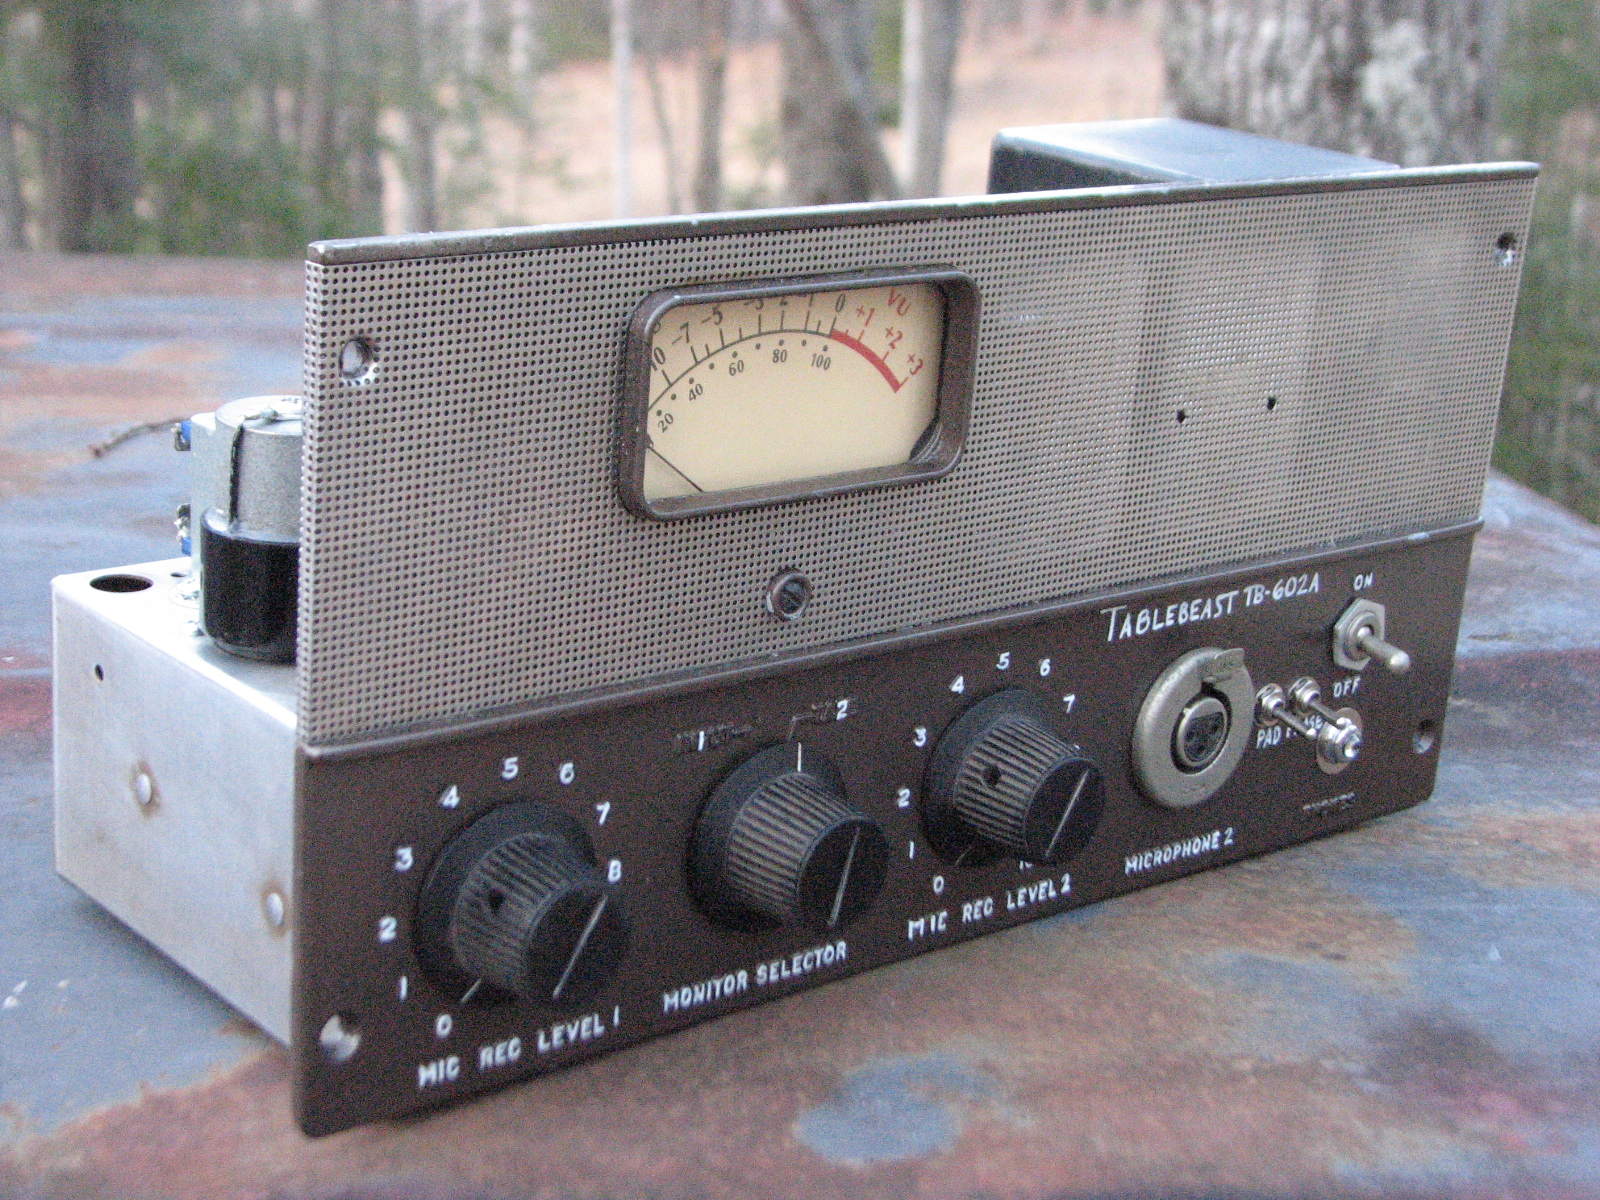
Ampex 602 Tablebeast Modified TB-602A 2CH Brute Force Preamp:

Here is my latest Ampex conversion. I tell you what, the Brute Force circuit really loves the 602. While the 601 and the Akai/Roberts monoblocks make amazing foundations for this circuit themselves, there is just something about the 602 that outshines them in my opinion. I think it may be the solid state high voltage PSU or the DC heaters that give it that inky black noise floor. It is a such a 3D sound that you wind up with something that sounds finished the way it does when you hit tape just right. But the best part is that it doesn't have the tape hiss or the hassle of messing with those aging machines. With this unit you get a brand new set of electronics built from the ground up with all new wiring, caps and resistors while using the best vintage parts to fill it out. I am very proud of my design and so far everyone who has been lucky enough to get one of these from me has been head over heels for them. Get one while you still can. Here are some more pictures.


Friday, January 18, 2013

Now Taking New Orders to Fund the Station


Tablebeast Modified Akai Roberts TB-2XP1 Preamp and 2x TB-A436 Vari-Mu Compressor:

 If you like this blog and would also be interested in getting something like what you see here for yourself, then now is your chance! I am beginning production on gear builds for the fundraising phase of the station. So, after a few months of catch-up on pre-XMFR orders, I have now have limited time available for new orders. Available will be my regular turn-key devices: (Akai / Roberts monoblocks, Magnecord PT6-J, Ampex 600, 601, and 602), trade-in orders (where you send me the donor to modify), and custom orders (pretty much anything under the sun: Bogen, Knight, Masco, LaFayette, Magnasync / Moviola, Heathkit, Dynaco, Sony, Teac, etc.) As you can see here on this blog, I make these old relics into new beast in the form of: guitar amps, microphone preamps, hi-fi stereos, audio effects, synthesizers and more. I can install add-on transformers of nearly any type as long as it fits the donor from brands like Jensen, Cinemag, Sowter, and Shure. I'd prefer to focus on what I am familiar with (which is a lot as you can see), but I am always looking for a new adventure as well. So let me know what you've got! Prices start at $399 for full rebuilds and can go on up to much more depending on the complexity of the mod and cost of additional parts. So, if you like something you see on this blog, drop me an e-mail at ::: xfmr AT xfmr DOT org ;;; and we can discuss what you're looking for.


Wednesday, January 9, 2013

Ampex 601 2 Ch Brute Force Preamp Conversion w/ Altec Iron


 Tablebeast TB-A601 Ampex 601 2 channel with Altec 4722 and 15095:

This is my new king of the hill. What an awesome, AWESOME preamp this turned out to be. I started with an Ampex 601 reel to reel tube electronics module. I then gutted and dismantled the whole thing. I separated the parts from stuff I planned to reuse and stuff I planned to discard. Of the discarded some parts, some are kept for other projects and spares while others are just thrown away. Sprague bumblebee caps? Yeah, I keep those when the values are not right for the conversion, you bet! Old cap cans and ALL the wiring? In the garbage it goes!
The next step is to prepare the chassis for my intended design. I rearrange the tube sockets in my needed layout and add a few sockets as needed. Then I install the new Weber cap cans with mounting brackets. The back panel gets all the Switchcraft chassis-isolated jacks, XLR input and pad/phase switches for channel 1 and pad phase switches are also added to the channel 2 input on the front.
When considering iron for this unit, I chose some of my favorite affordable and readily available vintage transformers. The Altec 4722 and 15095 were what I went with. I wired the inputs so that they will take the 4722 of course, but it will ALSO accept a 15095 or 15335 as an input depending n application. The outputs get 15095 plugs, but can also accept 15335 units as well. This makes the octal plug-in format function as Altec originally intended, where you can swap out the transformers easily to modify gain staging and impedance matching depending on what you stuff in there. Oh yeah, they also sound freaking INCREDIBLE!
The tubes in here are the 5879 Pentode for preamp duties, 12AU7 for line amp/output duty and the classic 5Y3 providing voltage rectification. They are set up as a pair of my Brute Force preamps which have insane amounts of gain. They are perfect for ribbons with low noise and the high gain, but really I have yet to find a mic that I don't like with it. Of course you can just turn the gain down when using a hot mic and if that doesn't get you in the sweet spot, engaging the pad and turning back up will get you there.
The inputs and outputs give you a LOT of different options. Of course it has balanced XLR inputs for mics and 1/4" DI inputs for instruments or other hi-z sources, but this unit also has dual outputs per channel. One output is tapped before the output transformer and is connected to an impedance balanced TRS 1/4" output jack. It can be used simultaneously with the transformer balanced outputs that are also on TRS 1/4" jacks. Now the impedance balanced outputs are HOT and I LOVE hitting an actual tape machine with this output as it will roast that tape if desired. The transformer on the output has a stepdown that knocks the signal down while balancing and adjusting impedance as is my preferred output for getting maximum coloration as it allows yo to crank the circuit a bit more.


Sunday, January 6, 2013

Projects Out the Door Before the END of the World!

OK, well, it didn't happen, but I was still determined to get certain projects out to folks before the Mayan deadline for our civilization, JUST in case!


Pair of Tablebeast 2xPre TB-2XP1 Microphone Preamplifier:

First up is a four channel set of mic pres that I was sad to see go. These are outfitted with Jensen inputs, have impedance balanced outputs, and were stuffed with some very special tubes. All four have GE 12AU7A tubes on the line amps, but the bottom pair has some fantastic German-made RFT EF86 pentodes and a GE 6X4 rectifier instead of the normal NEC-made valves that the I normally install. The first two channels do have these NEC tubes and they are simply fantastic of course, but the RFT and GE in the second pair just seem a bit more magical. Also, grainy pics I know. I took them at night in a hurry before I boxed her up. The apocalypse waits for no one.


Tablebeast TB-HR16, a Modified Alesis HR-16:

 This is a bit of a rare bird these days, at least in my hands. I don't do much circuit-bent stuff any more, but when tempted with this Alesis I couldn't resist. This is a fantastic drum machine even without the mods, but it takes to the patchbay style mod so well it almost seems like a shame to keep them stock. I hadn't done one of these in years, but it all came back once i started and I am very please with the results. Now that I have become familiar with what the guts of this guy actually ARE, I am really impressed with this advanced-for-the-time drum computer. So impressed that I am on the lookout for one of these to keep for myself. Oh yeah, the back panel for this guy was missing when I got it, so it got some hand labels on there. I was bored and there was an empty space ont he face, so it got a little unplanned beast drawing. What the heck.


Tablebeast Pre+Amp TB-PPA1-R 3U Rack w/ Jensen:

This is a rack mount Pre+Amp. Of course I have built dozens of these by now, but this one was particularly cool. It had the Jensen inputs which I just can't say enough good things about. Don't get me wrong, I love the Shure inputs that I usually use. They have a great utilitarian quality that I try to compare to denim when folks ask me to explain the difference between the Shures and the Jensens. What do I relate the Jensens to? Silk of course! So the Shures are jeans and the Jensens are a kimono. The Jensens really are smoother and less aggressive so I think it is a decent comparison. Being a man of many tastes, I like them both in any case. Anyway, this unit was awesome and is finally on the other side of the pond and hopefully in its new owner's hands by now. Enjoy!

Saturday, December 22, 2012

My Newest Akai Roberts Mod Creation: The Pre+EQ


Akai / Roberts Pre+EQ Mod:

About a year ago I started messing with some EQ circuits for a new design that incorporated a microphone preamplifier and an EQ in one Akai donor module. I knew that for the preamp part of the device I wanted something totally different than my Brute Force Preamp, so I settled on the mic preamp circuit from the old Tube RCA Broadcast Consoles. It uses two 12AY7/6072 tubes and the circuit I prototyped years ago sounded great. It really is a completely different tone than the Brute Force, so it fit well with my plans. SO, for the EQ I wanted something a bit different: not the same old boring Pultec style for me. Instead I wanted to find the best PA-Style, 'James', 2-band EQ. I also wanted to incorporate some tone switching and a variable low cut filter. What I settled on was a hodge-podge of circuit bits. I used most of the 2-band circuit from the Bogen MXM mixer, a simple variable low cut circuit found on the net, a boost switch that moves the frequency band of the treble control down into the mid range a bit, and finally a 'Beef' switch that removes the negative feedback from the circuit and adds bypass caps to two cathode resistors simultaneously. I will post more details and a final schematic soon.


Tuesday, November 27, 2012

Tons of New Designs Brewing

Don't worry, folks! I may have recently moved to the very edge of the Green River Gorge, but I have not yet fallen off the face of the Earth. I have so much new stuff that I have been brewing that I just can't WAIT to share it with all of you. New Akai / Roberts, Magnecord, Tape Delay (Ampro and Webcor) designs are simmering while I close out my waiting list for 2012. Look for some BIG moves come January! Pictures? Well,  I do have pictures of my new place and my new tractor, er... truck.


Wednesday, November 7, 2012

Webcor Tube Reel to Reel into DIY Tape Delay Echo


Webcor Royalite model 2001-1C All Tube Reel to Reel:

I just bought this lovely mono, tube powered reel to reel off of an auction site. I saw a video on youtube where someone made a crude version of a tape delay with a similar deck. For my version I have some more detailed and involved plans to completely transform this unit into a full fledged tape delay with adjustable tape speed, microphone input (with transformer), preamp, simple mixer, and power section that drives a speaker. So, it will be a colored microphone preamp and low watt guitar amp in addition to being a tape delay! I am even working out how to modify the original little crystal mic to fit on a standard mic stand clip by adding a handle. I have two of these Webcor mics headed my way, so I may just wire them in series and or parallel as some kind of double-element mic. Of course this would be a very colored mic, but so is the preamp! Here is the original schematic.


Thanks to Dr. Zee of http://www.mzenertainment.com for scanning this schematic. Be sure to check out his site. If you like what I am doing here on this blog you'll love the amazing projects he has built for his own studio. I am really impressed and hope to get XFMR to that point soon.

Looking over this schematic, this unit is ripe for modification. All the tubes are driven by the power transformer, so no weird AC doubling circuit for power tube B+ like found in the Wollensak T-1500 units. The motor is an AC type and not a good candidate for adjustable speed, so right there I will have to start looking for a DC motor to replace it. My first order of business is to examine the schematics of dedicated tube tape delays like the Gibson Echoplex EP1 and EP2 to see what parts of this circuit I can toss. First thing to go is all the switching. The modified unit will have two modes: tape spinning as a delay and tape not spinning as a straight up amplifier. I will have a dedicated toggle switch that cuts the motor on and off and another toggle with a footswitch in parallel that mutes the delay circuit.


In my plans I would like to have just one extra playback head. No need for multitaps as that just gets more complicated. For controls I will keep it simple: preamp gain, feedback amount, dry level, wet level and of course a tape speed control. There will also be a 1/4" footswitch jack to round out the controls. I/O will include an XLR input with pad and phase switch, a Hi-Z input, speaker-level 8 ohm output, and a line level output. It has a built-in speaker, but I will have a switch that switches this to a dummy load when necessary. The reason for the XLR input is that this unit will be made for vocals in addition to instruments, so I figured if I remove the counting mechanism I will have plenty of room on the face for the female XLR jack.

Here are some additional pictures of the donor unit and a few other parts units that I bought mostly for their Webcor heads, but I am sure I will find other parts to vulture for this and the next unit. I am planning on building two of these: one for my good friend and patron Damiam Asker and one for the XFMR studio collection.

 
Webcor Regent model EP2006-1A:

This model is very similar to my main EP2001-1C unit and will make a fantastic parts donor.


Webcor Regent model GP2910-1

This last model has vastly different guts, thought it looks similar from the outside. It should still yield many great parts for this pair of mods.

Saturday, October 6, 2012

Metasonix Wretch Machine S-1000 TUBE Synthesizer


Metasonix S-1000, the Wretch Machine:

For the longest time I have been focused solely on recording equipment with my tube projects. I used to really be into weird synthesizers back in my circuitbending days. My interest in synthesizers has been piqued lately so now I have come full circle back to them. This time of course I want to make them all out of tubes! This Metasonix Wretch Machine is made out of an awful lot of tubes, that is for sure! I opened the case up just to see what is going on under the hood and I saw not only tubes, but a few solid state bits in there as well. Based on Eric Barbour's DIY projects on Ken Stone's analog DIY synth site I can guess what is going on in there.

Where my designs will differ from these current Metasonix ones is that I will be using true all-tube designs. NO solid state anything in my planned designs! From the tube rectifier, to tube VCA, tube LFO, tube VCO, tube PWM, etc they will stay purely thermionic! I will start with some older TS series Metasonix circuits and tweak them to fit into my Akai/Roberts donor chassis. Anyway, here is the S-100 I currently have to mess around with. Unfortunately I have to sell it, but it will be replaced with my very own modular tube synth based on similar circuits.

By the way, these circuits run on Hz/v CV so I am looking for a Yamaha CS5, CS10, or CS15 to use as a controller. Let me know if you have one of these beasts at a reasonable price. Even if it is broken I can probably fix it.

This is a jam that a friend of mine did using the Wretch for the very first time:

Thursday, September 20, 2012

New Akai Roberts Tube Mod Stuff from August 2012

I have been tearing through my waiting list and trying to get to zero so I can begin the studio gear in earnest. I haven't had much time to update the blog here in a bit. I do have some new pics taken by my friend Patrick Olin. So, for now, enjoy.


Tablebeast TB-PPA1 Pre+Amp, front 3/4 view:


Tablebeast TB-PPA1 Pre+Amp, rear view:


Tablebeast TB-PPA1 Pre+Amp, bottom view:


Tablebeast TB-PPA1 Pre+Amp, bottom 3/4 view:


Tablebeast TB-2XP1 2x Preamp, front 3/4 view:


Tablebeast TB-2XP1 2x Preamp, rear 3/4 view:


Tablebeast TB-PLX1 Plexi8, front 3/4 view:


Tablebeast TB-PLX1 Plexi8, rear 3/4 view:


Tablebeast TB-2XP1 2x Preamp, front 3/4 view:


Tablebeast TB-2XP1 2x Preamp, rear 3/4 view:


Tablebeast TB-PPA1 Pre+Amp AND TB-PLX1 Plexi8 in wood case, case closed front 3/4 view:


Tablebeast TB-PPA1 Pre+Amp AND TB-PLX1 Plexi8 in wood case, case open front 3/4 view:


Tablebeast TB-PPA1 Pre+Amp AND TB-PLX1 Plexi8 in one-of-a-kind case, rear 3/4 view:


Tablebeast TB-PLX1 Plexi8, front 3/4 view:


Tablebeast TB-PLX1 Plexi8, rear 3/4 view:


So here they are, my most recent Akai Roberts Tube monoblock conversions from August. Please leave comments here and I will try to reply to all of them.